Cheesy Chicken Fritters – My Go-To Comfort Recipe
The first time I made Cheesy Chicken Fritters, it was completely unplanned. I had ground chicken in the fridge, and although I originally intended to make something entirely different, I suddenly craved something crispy, savory, and satisfying. Therefore, I started pulling out ingredients that always seem to work well together. Cheese, garlic, herbs, and something to bind it all together. At that moment, I did not expect much. However, what happened next completely changed how I viewed simple ground chicken.
As soon as the mixture came together, I noticed the texture was already promising. It felt soft yet structured, and the sharp cheddar added tiny golden streaks throughout. Then, when the first fritter hit the hot pan, the sound alone told me everything. That gentle sizzle, steady and confident, immediately filled the kitchen. Meanwhile, the aroma of melting cheese and garlic slowly spread, and I remember standing there, watching carefully, almost unwilling to flip it too soon.
When I finally turned it over, the surface had transformed into a beautiful golden crust. That moment never gets old. Still, I always feel a small sense of anticipation before tasting the first one. Once I took a bite, the contrast was exactly what I hoped for. The outside had a delicate crispness, while the inside stayed juicy and tender. In addition, the cheese created little pockets of richness that made every bite more interesting.
Since then, Cheesy Chicken Fritters have become something I return to again and again. They remind me that great food does not require complicated techniques. Instead, it requires attention, patience, and an appreciation for simple ingredients working together.
Why Cheesy Chicken Fritters Work So Well
Ground chicken can sometimes feel unpredictable. However, when paired with the right ingredients, it becomes incredibly versatile. Cheese plays a critical role here. As it melts, it binds the mixture and adds both moisture and flavor. Therefore, each fritter remains tender while developing a crisp exterior.
Meanwhile, almond flour adds subtle structure without heaviness. Unlike traditional breadcrumbs, it keeps the texture light. In addition, it allows the chicken flavor to remain the star. I noticed this difference clearly the first time I compared batches. The almond flour version stayed softer and juicier.
Garlic and parsley, although simple, contribute depth. At first, they seem minor. However, as the fritters cook, those flavors bloom. The garlic mellows, and the herbs add freshness. Together, they balance the richness of the cheese.
Temperature also matters more than people realize. When the pan is properly heated, the fritters seal quickly. As a result, juices stay inside. On the other hand, if the pan is too cool, the fritters release moisture and lose their crisp surface.
Over time, I learned that patience during cooking makes a noticeable difference. Waiting those few extra moments before flipping allows the crust to form completely. Therefore, the fritters hold together better and look more appetizing.
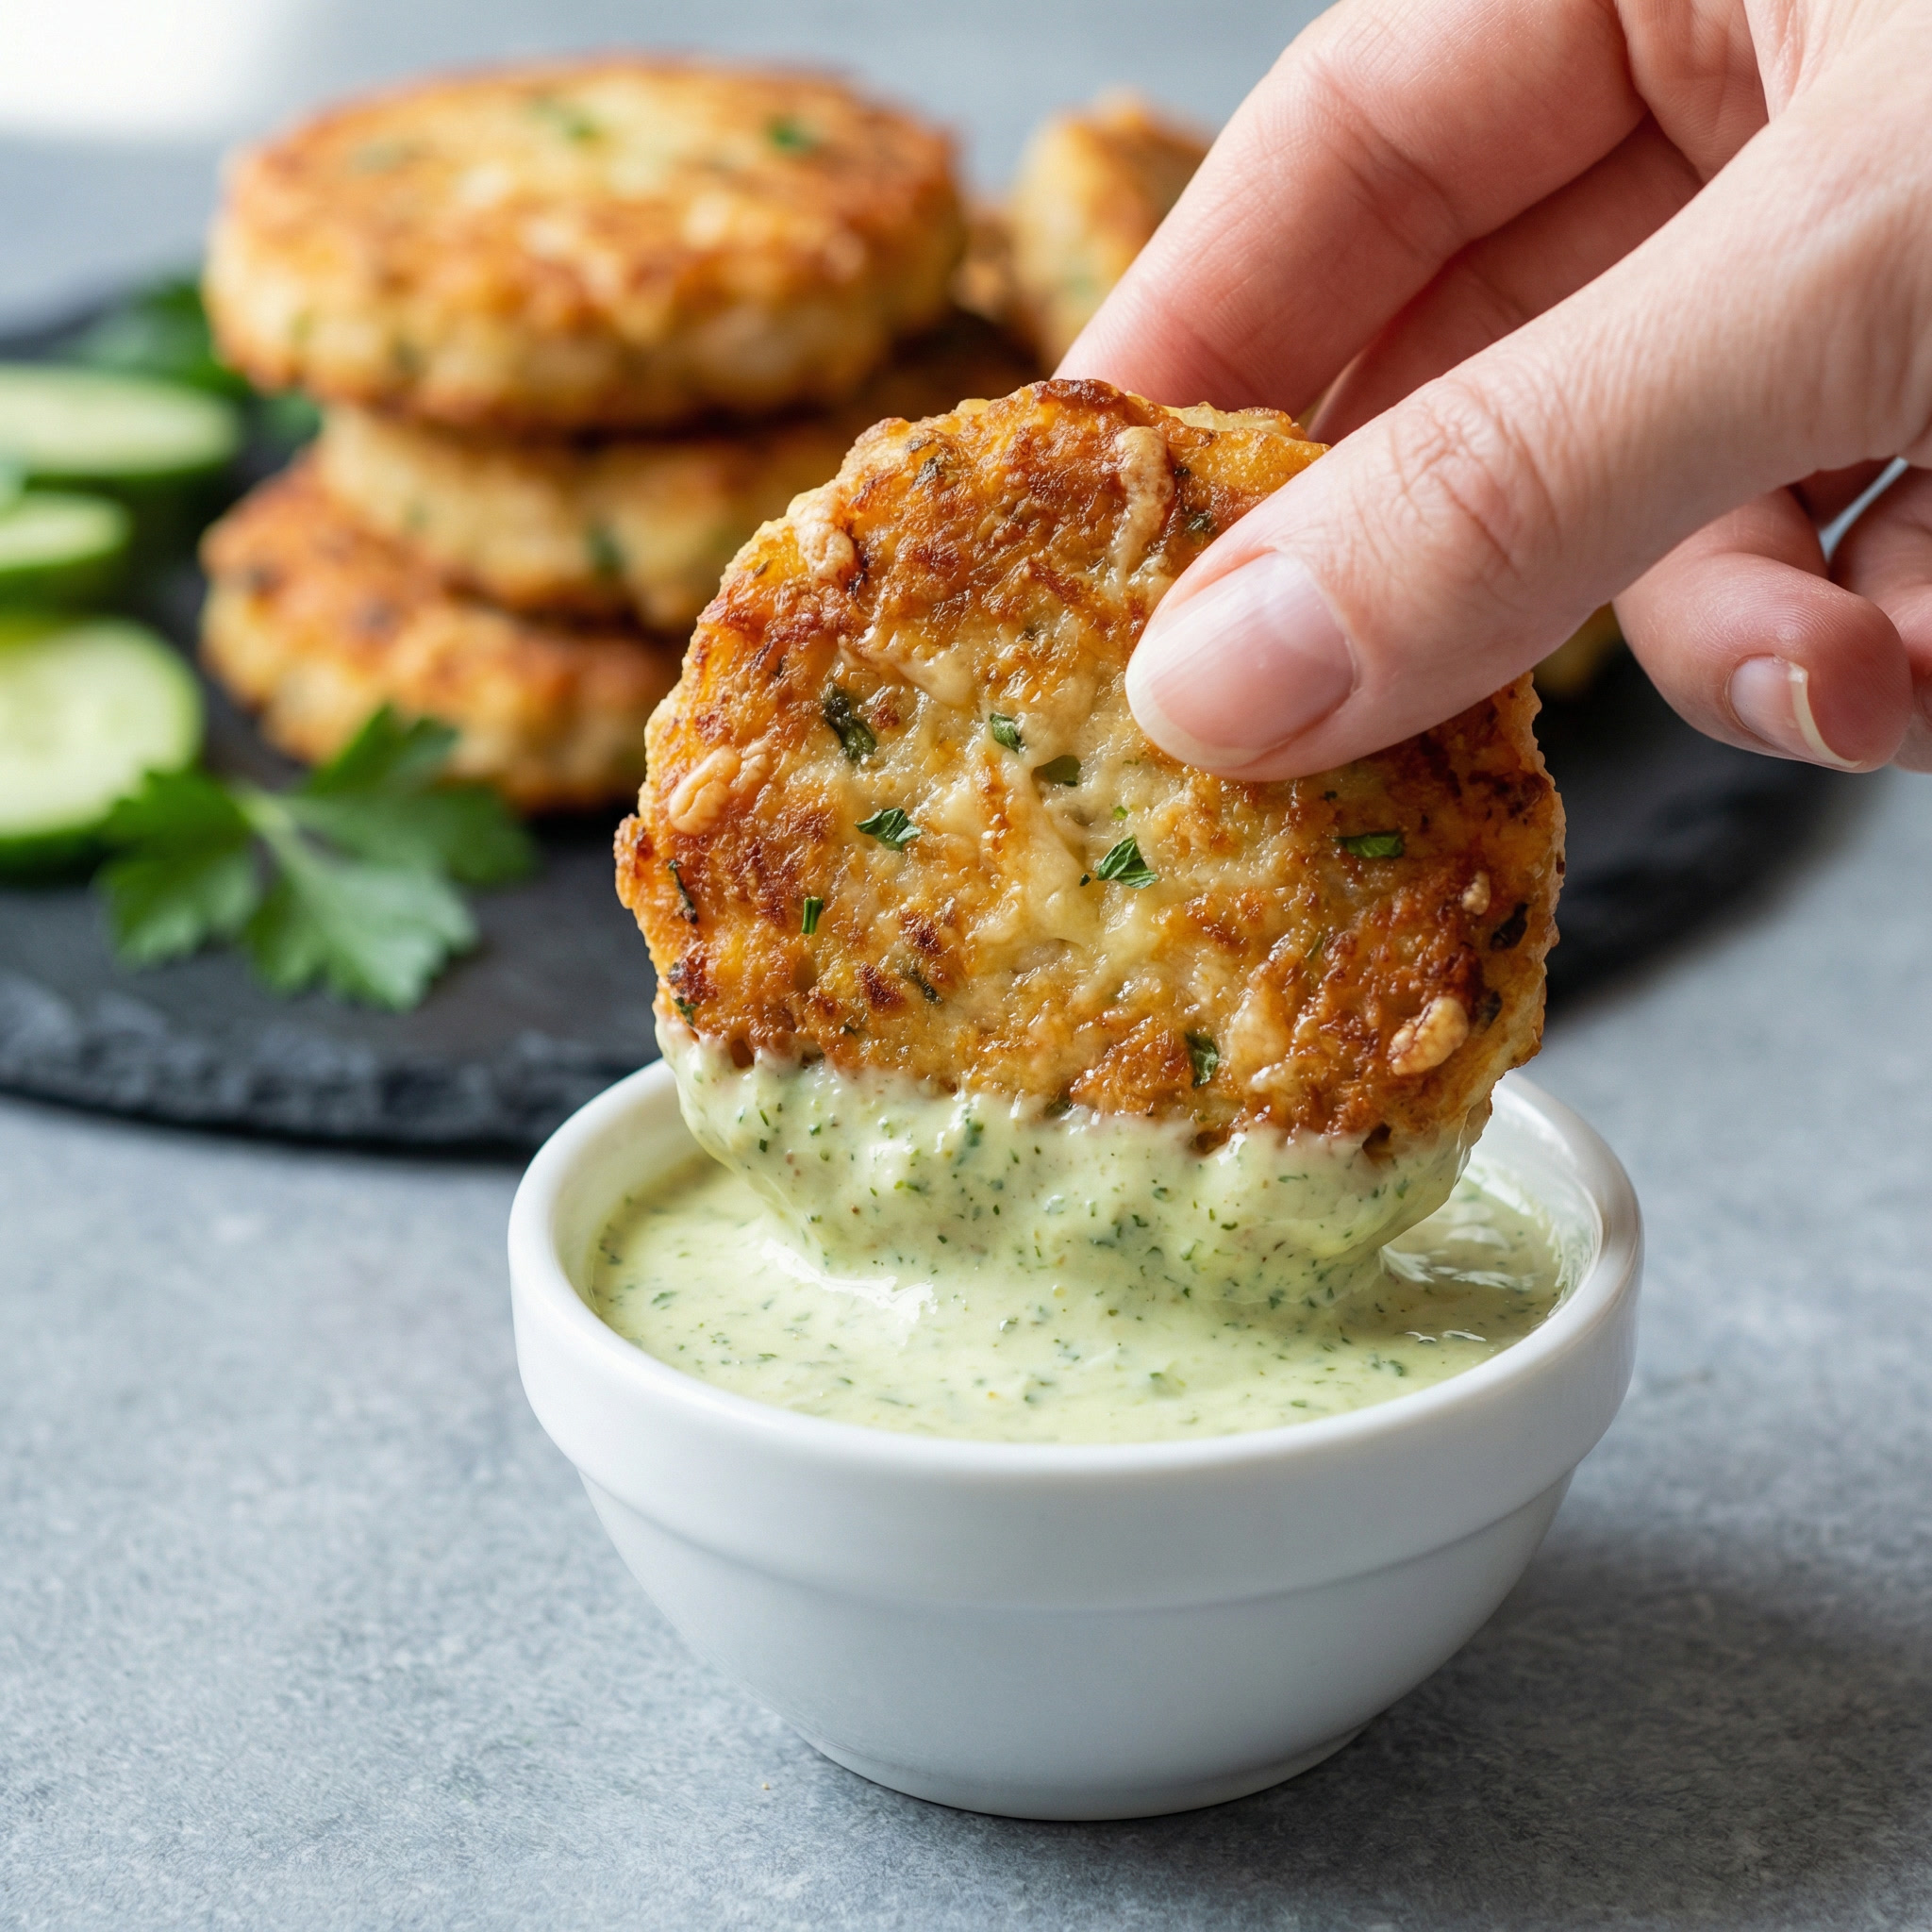
The Moment Cheese Meets Chicken in the Pan
There is something deeply satisfying about watching cheese transform. At first, it blends quietly into the mixture. Then, as heat touches it, everything changes. The edges begin to bubble, and tiny golden spots appear. Meanwhile, the chicken firms up and develops color.
The sound is always the first signal. That gentle sizzling tells you the pan temperature is just right. Next, the aroma follows. It starts subtle, then gradually fills the room. I often find myself hovering near the stove longer than necessary, simply enjoying that moment.
Visually, the change is dramatic. Pale patties slowly turn golden, then deepen slightly in color. This stage requires attention. However, once you recognize the signs, it becomes intuitive.
Texture, of course, is the final reward. The outside becomes lightly crisp, while the inside stays moist. This contrast is what makes Cheesy Chicken Fritters so satisfying.
Sometimes, I serve them immediately. Other times, I let them rest briefly. Both approaches work, although resting helps the juices settle.
How Cheesy Chicken Fritters Became a Weekly Tradition
Eventually, this recipe became part of my routine. Initially, I made it occasionally. However, over time, it earned a permanent place in my kitchen. Its reliability made it special.
On busy evenings, it provides something comforting without requiring too much effort. Meanwhile, on slower days, I enjoy taking extra time, letting each fritter brown perfectly.
I also discovered how adaptable it is. Sometimes, I serve them alongside vegetables. Other times, I pair them with bread alternatives like cloud bread. One of my favorites is this simple version: Cheese Egg Cloud Keto Bread. The texture works beautifully with the fritters.
Occasionally, I even crumble leftovers into soups. For example, they add incredible flavor to something like Keto Lasagna Soup. That combination turns a simple soup into something far more satisfying.
Memories often form around these small meals. The smell, the sound, and the anticipation all become part of the experience.
Serving Cheesy Chicken Fritters in Everyday Meals
Versatility makes these fritters incredibly useful. First, they work as a main dish. Then, they easily become snacks, appetizers, or even breakfast additions.
I especially enjoy serving them fresh from the pan. At that point, the crust is at its peak. However, they also reheat well, which makes them practical.
Sometimes, I add simple sides. Other times, I keep things minimal. Either way, they remain satisfying.
Texture continues to be their strongest feature. The crisp exterior and juicy center create balance. Therefore, they never feel boring.
Over time, I stopped viewing them as just another chicken recipe. Instead, they became something dependable.
Tested Tips & Common Mistakes
First, always chill the patties. This step makes a noticeable difference. Without chilling, they feel softer and harder to flip.
Next, use freshly grated cheese. Pre-shredded versions do not melt the same way. Therefore, the crust develops better with fresh cheese.
Another important detail is pan temperature. Medium heat works best. If the heat is too high, the cheese burns before the chicken cooks.
One mistake I made early on was flipping too soon. As a result, the fritters broke apart. Now, I wait until the edges look firm.
Also, avoid overcrowding. Space allows even cooking.
Small Details That Elevate Chicken Fritters
Small adjustments can change everything. For example, allowing the fritters to rest briefly improves texture. Meanwhile, using a heavy skillet ensures even heat.
Even the mixing process matters. Gentle mixing keeps the texture tender. Overmixing creates density.
Paying attention during cooking also helps. Watching color and listening to sound provides clues.
Eventually, these small habits become second nature.
Frequently Asked Questions
Can I freeze Cheesy Chicken Fritters?
Yes, and I often do. After cooking, I let them cool completely. Then, I freeze them in a single layer first. After that, I transfer them into a container. This prevents sticking.
Can I use another cheese?
Yes. However, sharper cheeses provide more flavor. Mild cheeses work, but the result feels less rich.
Why do my fritters fall apart?
Usually, they were not chilled long enough. Therefore, chilling is essential.
Can I bake them instead?
Yes, although pan frying gives the best crust. Baking works but produces a softer exterior.
How long do leftovers last?
In my experience, they stay fresh for up to 4 days refrigerated.
Nutrition Information (per serving):
-
Calories: 420
-
Total Carbs: 3 g
-
Net Carbs: 2 g
-
Protein: 32 g
-
Fat: 30 g
These values are estimates.
Cheesy Chicken Fritters
Ingredients
Equipment
Method
- First, line a large baking sheet with parchment paper. This step prevents sticking and makes cleanup much easier later. Then, set the prepared sheet aside so it is ready when the mixture is finished.
- Next, place the ground chicken into a large mixing bowl. After that, add the grated cheddar cheese, almond flour, egg, minced garlic, dried parsley, salt, pepper, and red pepper flakes. Using clean hands, gently combine everything. At this stage, mix until just evenly incorporated. Avoid overmixing because excessive handling can make the fritters dense instead of tender.
- Then, scoop about 2 tablespoons of the mixture and form it into a small patty. Gently flatten it to about 2 1/2 to 3 inches wide and about 1/2 inch thick. Continue forming patties until all the mixture is used. Place each patty onto the prepared baking sheet in a single layer without overlapping.
- After that, transfer the baking sheet into the refrigerator. Chill the patties for at least 1 hour. This step is essential because it allows the mixture to firm up, which helps the fritters hold their shape during cooking. In addition, chilling improves the texture and prevents excess spreading.
- Once the fritters are chilled, place a large skillet over medium heat. Then, add 1 tablespoon of olive oil and 1/2 tablespoon of butter. Allow the butter to melt completely and begin to foam slightly. This indicates the pan is ready.
- Next, carefully place 8 to 10 patties into the skillet. Avoid overcrowding the pan because proper spacing ensures even browning. Cook the fritters for about 3 minutes on the first side. During this time, do not move them. This allows a golden crust to form.
- Then, flip each fritter gently using a spatula. Cook the second side for another 3 minutes. The exterior should be golden brown, and the interior should reach an internal temperature of at least 165°F (74°C).
- After that, transfer the cooked fritters onto a plate lined with paper towels. This step removes excess oil and keeps the exterior crisp.
- Repeat the process with the remaining olive oil, butter, and patties. Between batches, scrape any burnt cheese bits from the pan if necessary. This prevents bitterness and ensures clean flavor.
- Finally, serve the fritters warm. They pair well with dipping sauces such as ranch, garlic aioli, or a simple herb yogurt sauce.
Notes
Freshly grated cheese melts better and creates a better crust.
Do not cook over high heat, as the cheese may burn before the chicken cooks through.
Scrape the skillet between batches if cheese residue accumulates.